Colleen Schnettler
March 11, 2024
(Psst...skip all this hassle and use HelloQuery - it's easy and free)
With read-only database credentials you can export your SQL to CSV for free.
Introduction
Exporting SQL data to CSV (Comma-Separated Values) format is common in data management and analysis. CSV files are widely supported and easily imported into various applications such as spreadsheets and statistical software. This guide will walk you through exporting SQL data to CSV, providing step-by-step instructions and considerations to ensure a successful conversion.
This guide contains real-world scenarios and databases. The tutorial steps will use a Heroku-hosted Postgres database with the command line utility pqsl and the GUI TablePlus. The steps outlined in the guide will work for any database with slight modifications depending on the tools used.
Table of Contents
What is SQL?
Structured Query Language (SQL) is a programming language that manages and manipulates relational databases. It provides a standardized syntax to interact with databases, allowing users to retrieve, insert, update, and delete data. SQL databases store data in organized structures called tables, which consist of rows and columns. Each column represents a specific attribute or field, while each row contains a unique set of data values corresponding to those attributes. SQL supports powerful querying capabilities, enabling you to retrieve specific subsets of data using SELECT statements, filter data with WHERE clauses, join multiple tables, aggregate data with functions, and sort the results.
What is CSV?
CSV (Comma-Separated Values) is a plain text format representing tabular data. In a CSV file, each line typically represents a single row of data, and the values within each row are separated by commas (or other delimiters, such as semicolons or tabs). The first line of the file often contains the column headers. CSV files are simple and widely supported, making them an ideal format for data interchange between systems. They can be opened and manipulated using spreadsheet software, imported into databases, or processed with programming languages. CSV format does not support data types or complex structures like SQL databases. All values are treated as text, and it's important to consider data formatting. Understanding the differences and limitations between SQL and CSV formats will help you plan and execute the export process effectively. In the next section, we'll discuss selecting SQL data for export, covering the necessary considerations when writing SQL queries.
Section 1: Connecting your database
To export SQL data to CSV, you must first establish a connection between your application or tool and the database where the data is stored. This section will guide you through the process of connecting to your database.
1.1 Gather Database Connection Details:
You must gather the necessary information about your database before establishing a connection. You will want to make sure the credentials you create are read-only. The specific details required will vary depending on your database management system, but here are some common elements:
- Host or server address: This is the location where your database resides. It can be an IP address or a domain name.
- Port number: The port through which your database accepts connections. The default port is often used, such as 3306 for MySQL or 5432 for PostgreSQL.
- Database name: The name of the specific database within your database management system.
- Username and password: Valid credentials with sufficient privileges to access the database. Remember - these should be read-only for safety!
For this tutorial, we will use the example of a Postgres database hosted on Heroku. Different database providers may have other steps.
If using Heroku, you can access Heroku Postgres by visiting your application page and selecting "installed add-ons" followed by "Heroku Postgres."
Select "Credentials," which will take you to the following page:

From this page, click "Create Credential. Name your new credential ("Report Access," for example).
On the following screen, select the application you'd like to connect to and set permissions as "read-only."
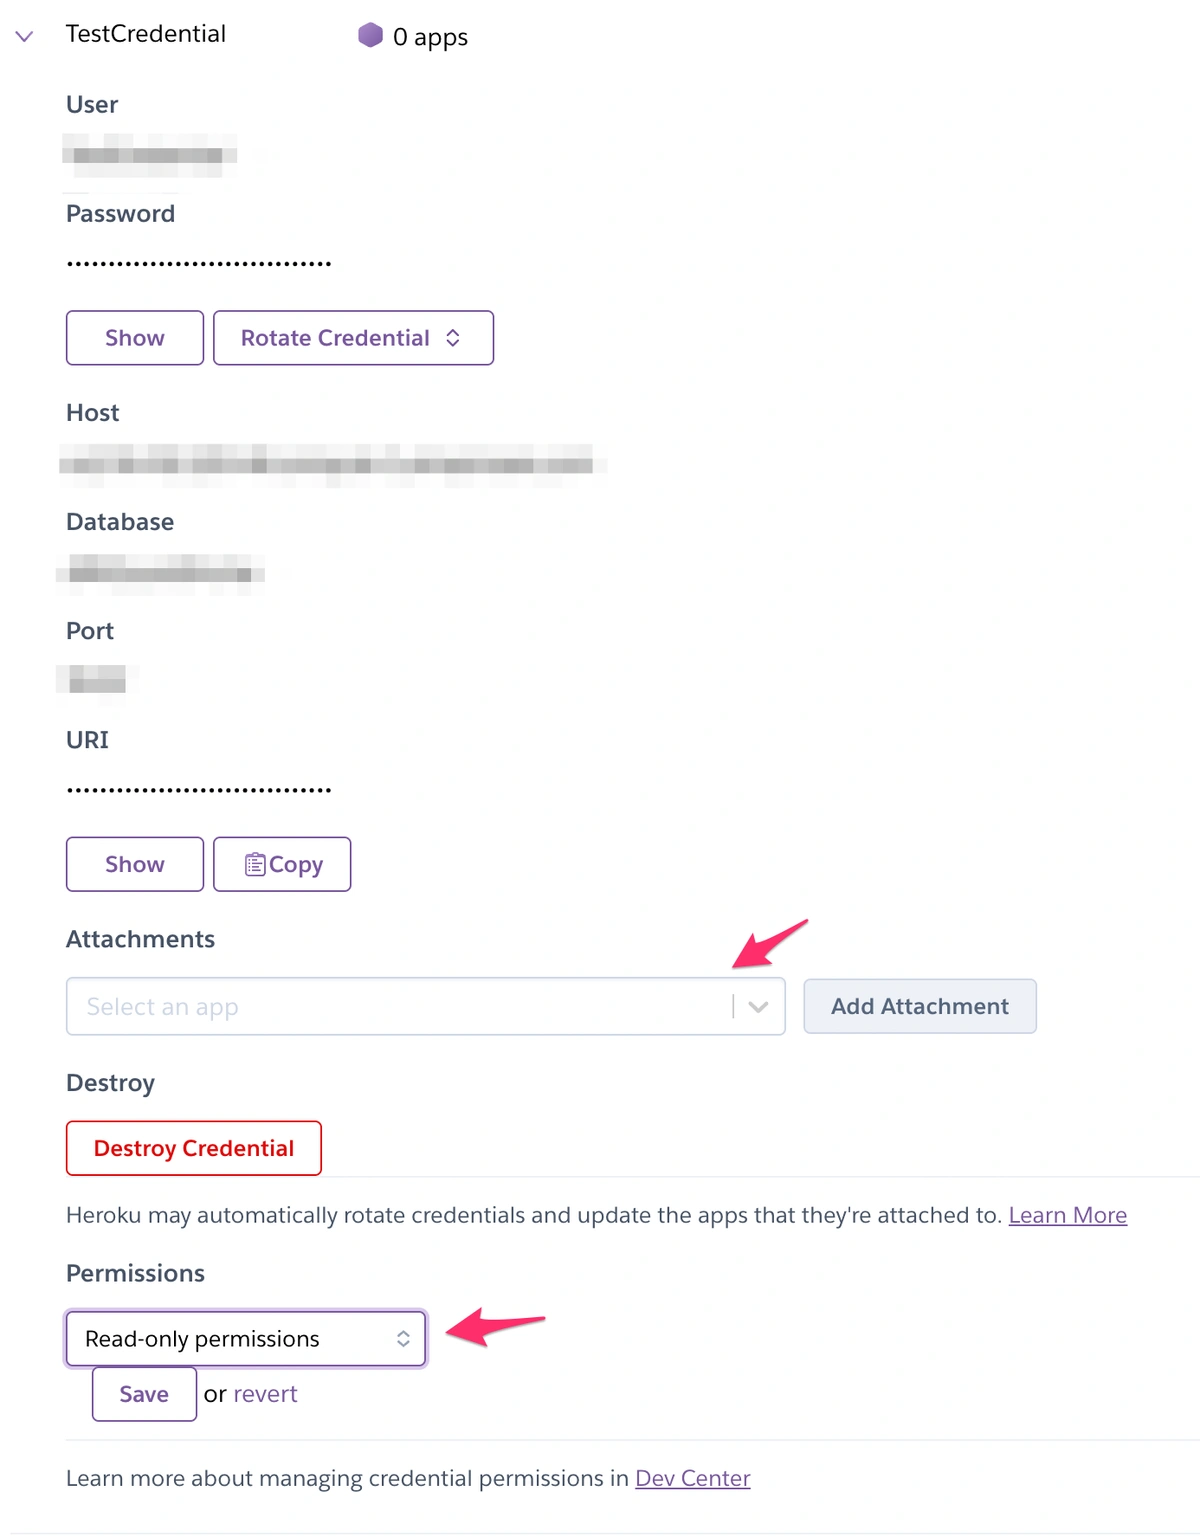
Great! Note this connection information because you will need it for the next section.
1.2 Choose a Connection Method:
Various methods exist to establish a connection to your database, depending on the tools and programming languages you use. Here are a few standard connection methods:
- Command-Line Interface (CLI): Many database management systems provide a command-line interface where you can enter commands to interact with the database. This tutorial will use
psql for Postgres.
- Graphical User Interface (GUI) Tools: GUI tools like phpMyAdmin, MySQL Workbench, or TablePlus offer a visual interface to connect to your database. They usually require you to input the connection details through a form or configuration settings.
- Programming Language Libraries: Programming languages like Python, Java, or PHP have libraries that provide the functionality to connect to databases. You can utilize these libraries to establish a connection programmatically and execute SQL queries.
1.3 Establishing the Connection:
Once you have your read-only database credentials, you can establish the connection. We will use TablePlus for this tutorial because it is freely available and connects to all database sources.
When you open TablePlus, click the "+" button.

You will then see a prompt asking you to pick a database. Select your database type and click "Create."

Grab the connection details you've saved from your database provider and enter them on the next screen:
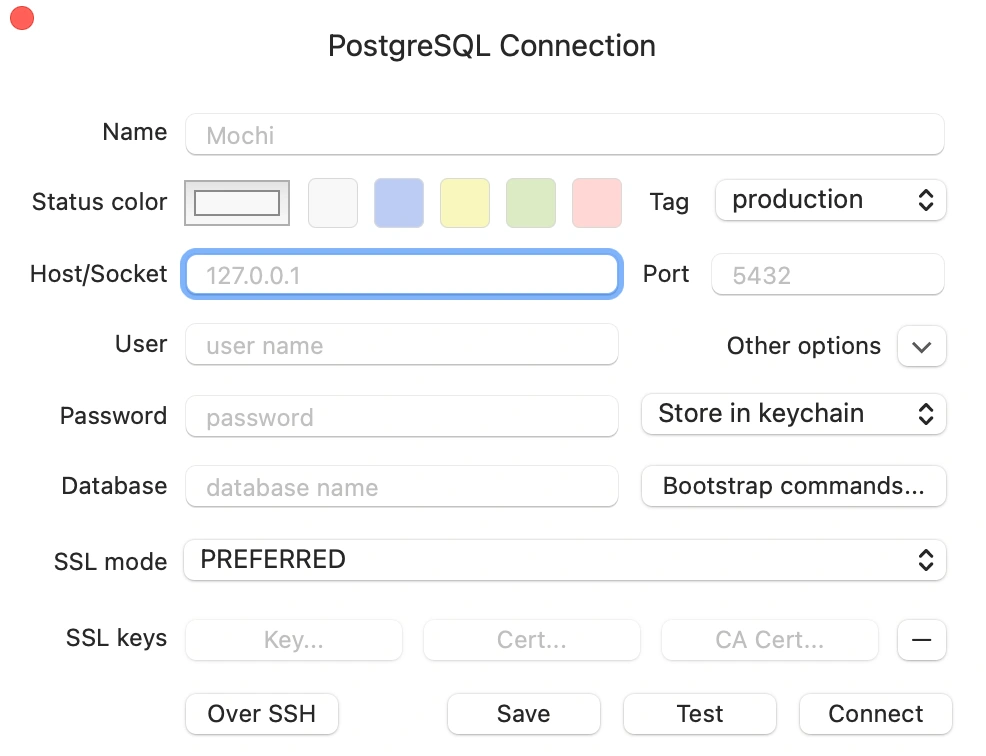
After you've filled in your database credentials, test the connection by clicking on the "Test" button. If everything looks good, click "Create" to establish your connection.
You should see a list of database tables on the left-hand sidebar and an open text area on the right.

Congratulations, you've successfully connected to your database!
Section 2: Selecting SQL Data for Export
Before exporting SQL data to CSV, select the specific data you want to include in the export. This section will guide you through the process of choosing SQL data effectively.
2.1 Writing SQL Queries:
SQL queries retrieve data from your database. To export the desired data to CSV, you must construct a query that retrieves the specific fields and rows you want. Start by identifying the tables from which you want to extract data. If you're using TablePlus or a similar GUI, you will see a list of tables in the left-hand sidebar. Next, determine the fields (columns) you want to include in the export. Use the SELECT statement to specify the fields you need. For example:
SELECT column1, column2, column3
FROM table_name
You can also use aggregate functions (such as COUNT, SUM, AVG) to perform calculations on the data before exporting it.
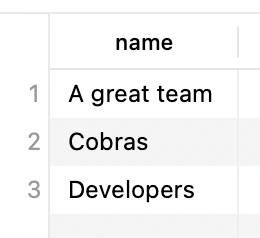
To give you a concrete example, if you're trying to get the names of all of the teams in your database, you can write the following SQL:
SELECT name FROM teams;
This query will return a table with a list of all the team names, as shown in the below screenshot:
2.2 Filtering and Sorting Data:
Often, you'll need to filter data based on specific conditions or criteria. Use the WHERE clause to narrow down the results to meet your requirements. For example:
SELECT column1, column2
FROM table_name
WHERE condition
You can apply various operators (e.g., =, <>, >, <, BETWEEN, LIKE) to create conditions that filter the data effectively.
To continue with the example above, let's select only the names of all the teams that have upgraded.
SELECT contact, name FROM teams WHERE has_upgraded = 'true';
Additionally, you can sort the exported data in a specific order. Use the ORDER BY clause to sort the results based on one or more columns. For example:
SELECT column1, column2
FROM table_name
ORDER BY column1 ASC
If you are trying to find all teams that have upgraded and return only their name and contact information sorted alphabetically, you could write something like the following:
SELECT contact, name
FROM teams
WHERE has_upgraded = 'true'
ORDER BY name ASC
2.3 Joining Tables (if necessary):
If your desired data spans multiple tables, you must join them to retrieve the complete information. SQL supports different types of joins (e.g., INNER JOIN, LEFT JOIN, RIGHT JOIN) to combine data from multiple tables. To join tables, specify the tables involved and the columns used for the join condition. For example:
SELECT column1, column2
FROM table1
JOIN table2 ON table1.column = table2.column
For example, if a team can have many conversations and you'd like to get the topic of those conversations you can write the following:
SELECT topic
FROM conversations
INNER JOIN teams ON conversations.team_id = teams.id
Once you have crafted the correct SQL queries, you can export the data to CSV for easy use in standard programs such as Microsoft Excel. We will delve into the details in the next section.
Section 3: Exporting data
This section will explore different methods for exporting SQL data to CSV.
3.1 Using SQL Command-Line Tools:
Many SQL database management systems provide command-line tools that allow you to execute SQL queries and export the results to CSV directly from the command line.
In this section, we will use the psql utility for Postgres. You may need to look up the instructions for your specific tool.
Here's an example of exporting data to CSV using the psql command-line tool:
psql -d your_database_name
COPY (SELECT name FROM teams )
    TO '/your_custom_path/test_file.csv'
    WITH (FORMAT CSV, HEADER);
This command selects the name column from the teams table and saves the results into a CSV file named test_file.csv, located at the provided file path.
3.2 Exporting from SQL GUI Tools:
Graphical User Interface (GUI) tools for managing databases often provide a user-friendly way to export SQL data to CSV. These tools typically offer export functionality to customize the export settings.
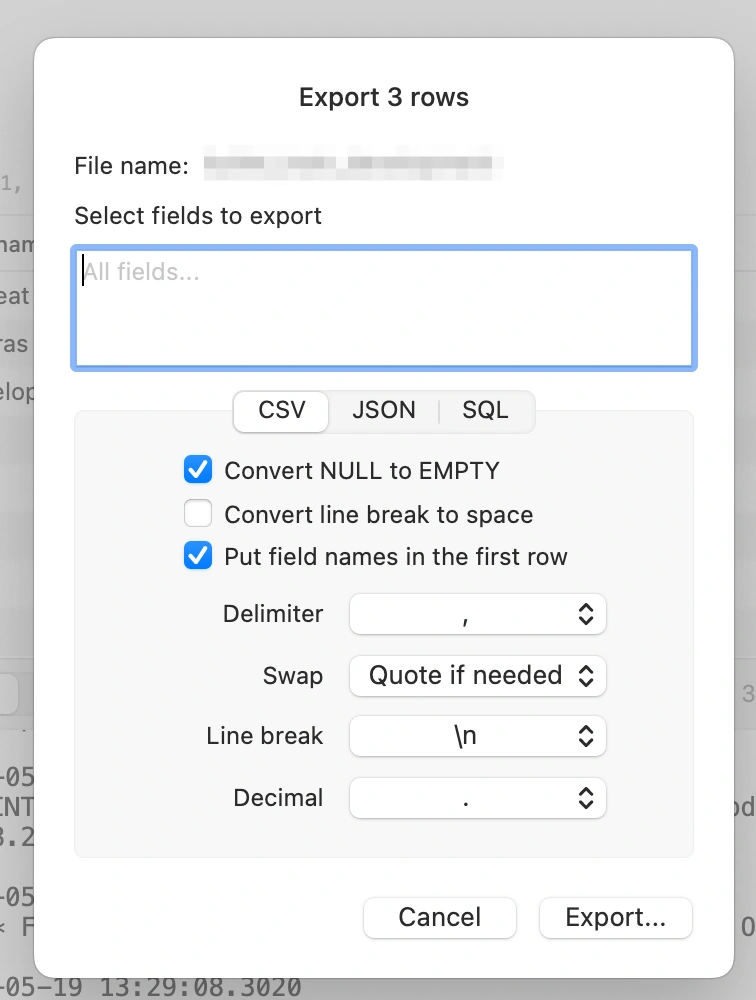
Continuing with the TablePlus example from the previous section, once you have created your SQL query, you can follow these steps to export the data to a CSV file:
- Run your SQL query to select the desired data.
- Click on the "Export" tab. Select the desired export columns, parameters, and format as "CSV."
- Click "Export" to initiate the export process.
Similar export capabilities exist in other GUI tools like MySQL Workbench, pgAdmin, and Microsoft SQL Server Management Studio.
With these methods, you can effectively export SQL data to CSV. The following section will discuss data formatting considerations to ensure accurate and well-formatted CSV files.
Section 4: Handling Data Formatting and Special Characters
When exporting SQL data to CSV, it's important to consider data formatting and special characters to ensure accurate and well-formatted CSV files. This section will explore common considerations and techniques for handling data formatting during export.
4.1 Handling Date and Time Formats:
Dates and times in SQL databases can be stored in many different formats. When exporting such data to CSV, you may need to convert formats or simplify the output.
For example, the SQL below retrieves the created_at column from the teams table and dumps it to test_file.csv.
COPY (SELECT created_at FROM teams )
TO 'path/test_file.csv' WITH (FORMAT CSV, HEADER);
The created_at column is a "timestamp without time zone." You can check column types using \d table_name in psql.
The CSV resulting from the SELECT statement above is copied below: 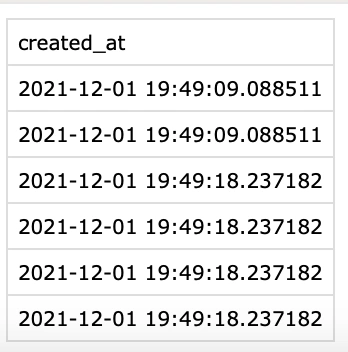
The date formats are confusing and could easily cause problems for an end user.
There are several ways to tackle this problem:
- Date and Time Functions: Utilize SQL's built-in date and time functions to format the data before exporting. For example, you can use
TO_CHAR in PostgreSQL to convert a date or timestamp to a specific format.
select to_char(created_at, 'DD/MM/YYYY') from teams;
The complete SQL
COPY (SELECT to_char(created_at, 'DD/MM/YYYY') FROM teams ) TO '/path/test_file.csv' WITH (FORMAT CSV, HEADER);
Returns a more human-readable date:

- Formatting in Export Code: If you are exporting programmatically, format the date and time values within your code before writing them to the CSV file. Programming languages often provide date and time formatting functions or libraries.
- Exporting Raw Values: Alternatively, you can export the raw date and time values as they are stored in the database, allowing the recipient to handle the formatting.
Choose the approach that best suits your requirements.
4.2 Escaping Special Characters:
CSV files may contain special characters that can interfere with the structure of the data, such as field delimiters, line terminators, or characters with special meaning (e.g., double quotes).
To handle these special characters:
- Character Escaping: Properly escape special characters by enclosing fields containing special characters within quotation marks.
- Library Functions: When exporting programmatically, leverage library functions specific to your programming language or CSV-handling libraries that handle character escaping automatically.
- Custom Solutions: Implement custom logic to handle character escaping if necessary, ensuring that you correctly address the specific requirements of your data and CSV format.
- By handling data formatting and special characters appropriately during the export process, you can ensure the integrity and consistency of your exported CSV files.
Depending on your export program, this may be handled for you. For example, if using pqsl, the following:
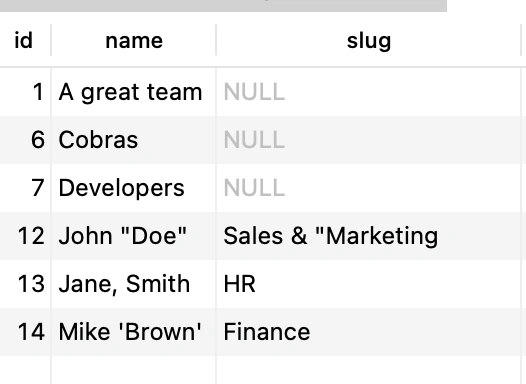
Will properly export with the " escaped 
This is a text rendering of the export, as you can see the special characters such as , and " are wrapped in additional ". This will enable smooth importing to a program such as Microsoft Excel.
Next, in Section 5, we'll explore advanced export options, including customizing delimiters and encodings, and automating regular exports.
Section 5: Advanced Export Options
In addition to the basic export methods, several advanced options exist to export SQL data to CSV. This section explores automating regular exports.
5.1 Automating Regular Exports
Automation can save time and streamline the process if you need to export SQL data to CSV regularly. Here's an example of how you can automate regular exports using cron jobs:
Scheduled Jobs with Cron:
Utilizing cron jobs allows you to schedule the execution of a script or command at specified intervals. You can set up a cron job to run a script that automatically performs the SQL data export and saves it to CSV. For instance, assume you have a script named export_data.sh that performs the SQL export and saves the CSV file. To schedule a daily export at 8:00 AM, you can add the following entry to the crontab file:
0 8 * * * /path/to/export_data.sh
In this example, the /path/to/export_data.sh represents the script that executes the SQL export. The cron job will run the script daily at 8:00 AM, automatically exporting the SQL data to CSV. You can customize the cron schedule according to your requirements. The cron syntax allows for fine-grained control over the execution frequency, such as specifying days of the week, hours, or minutes.
Automating regular exports with cron jobs ensures that your SQL data is consistently exported to CSV without manual intervention. This approach provides flexibility in defining the export schedule and can be easily adjusted.
Section 6: Troubleshooting
6.1 Troubleshooting Common Issues:
Here are some common issues that you may encounter when exporting SQL data to CSV, along with potential troubleshooting steps:
- Incorrect SQL Query: Ensure your SQL query is correct and retrieves the desired data. Double-check the query syntax, table names, and column references.
- Connection Issues: Verify that your database connection parameters, such as host, port, username, and password, are accurate. Ensure that the database server is accessible and you have the necessary permissions to access the data.
- File Path and Permissions: Check the file path where you intend to save the CSV file. Ensure that the directory exists and you have the necessary permissions to write to that location.
- Data Formatting Errors: If you encounter data formatting issues, review your data formatting and conversion logic. Ensure that date and time formats, numeric formatting, and special characters are handled correctly.
- Encoding Issues: If you encounter character encoding problems, verify that the correct encoding is used when reading and writing the CSV file. Ensure that the encoding settings are consistent throughout the export process.
Database-specific Considerations: Different databases may have specific requirements for exporting data. Consult the documentation or resources specific to your database to troubleshoot any database-specific issues that may arise. You can ensure a smooth SQL data export process and mitigate any challenges by troubleshooting and addressing these common issues.
Conclusion
Exporting SQL data to CSV is a valuable skill for extracting and sharing data in a widely compatible format. In this guide, we covered the essential steps and considerations for a successful SQL to CSV export process. Here's a summary of what we explored:
Understanding SQL and CSV Formats:
SQL is a language used to manage and retrieve data from databases. CSV (Comma-Separated Values) is a plain text format representing tabular data with fields separated by commas.
Selecting SQL Data for Export:
Write SQL queries to select the desired data for export. Specify table names, columns, and conditions to filter the data.
Exporting SQL Data to CSV:
Use command-line tools like psql or programming languages with SQL libraries to export SQL data to CSV. There are also many widely available GUIs. Customize the export process by specifying delimiters, encodings, and handling special characters.
Handling Data Formatting and Special Characters:
Be mindful of formatting considerations for dates, times, and numeric data. Escaping special characters, delimiters, and line terminators to ensure proper CSV structure.
Advanced Export Options:
Automate regular exports using tools like cron jobs or integration platforms.
Following these guidelines, you can confidently export SQL data to CSV, tailor the export process to your needs, handle large datasets efficiently, and automate regular exports. Remember to consider data formatting, special characters, and encoding requirements to ensure accurate and compatible CSV files. Mastering the art of SQL to CSV export empowers you to utilize and share your data effectively, unlocking insights and facilitating collaboration across different systems and tools. Thank you for joining us on this guide to mastering SQL to CSV exports. Happy exporting!
Stay in Touch!
Are you a developer constantly asked to create custom reports from a SQL database? Or maybe you're an operations director struggling to get the data you need to make business decisions?
Do you have this problem? We're building an app to make your life easier, and I'd love to talk to you!
Send the founder a message on Linkedin, Twitter or join our email list.